Introduction to the NV49A Lightbar
Are you ready to elevate your vehicle’s visibility and safety? The NV49A Lightbar is here to transform the way you light up the road, whether for emergency services, off-road adventures, or simply enhancing your truck’s look. This powerful lightbar offers bright illumination with multiple flash patterns, making it a versatile choice for various applications. Installing it may seem daunting at first glance, but fear not! With this step-by-step guide, you’ll have all the tools and knowledge needed to get your NV49A Lightbar shining brightly in no time. Let’s dive into how you can easily equip your ride with this essential accessory.
Tools and Materials Needed for Installation
When preparing to install the NV49A lightbar, gathering the right tools and materials is crucial. This ensures a smooth installation process. You’ll need basic hand tools like a socket set, screwdrivers, and pliers. These will help in securing the lightbar firmly onto your vehicle. Don’t forget about wire connectors and electrical tape. They are essential for safe wiring connections that can withstand various weather conditions.
Additionally, having zip ties on hand can keep wires organized and prevent any loose ends from causing issues down the line. Ensure you have a drill with appropriate bits if you need to create mounting holes. Proper preparation minimizes potential headaches during installation.
Pre-Installation Preparation
Before diving into the installation of your NV49A lightbar, proper preparation is crucial. Start by reviewing the user manual that accompanies the lightbar. Familiarize yourself with every component to avoid confusion during installation. Next, ensure your vehicle’s surface is clean and free of debris. This will allow for a better mounting experience and help maintain functionality over time.
Additionally, consider where you want to install the lightbar on your vehicle. Look for locations that provide optimal visibility without obstructing other critical features such as antennas or sunroofs. It’s wise to check local laws regarding lightbar usage in your area. Regulations can vary significantly depending on location, so being informed helps you stay compliant and safe while using your NV49A lightbar effectively.
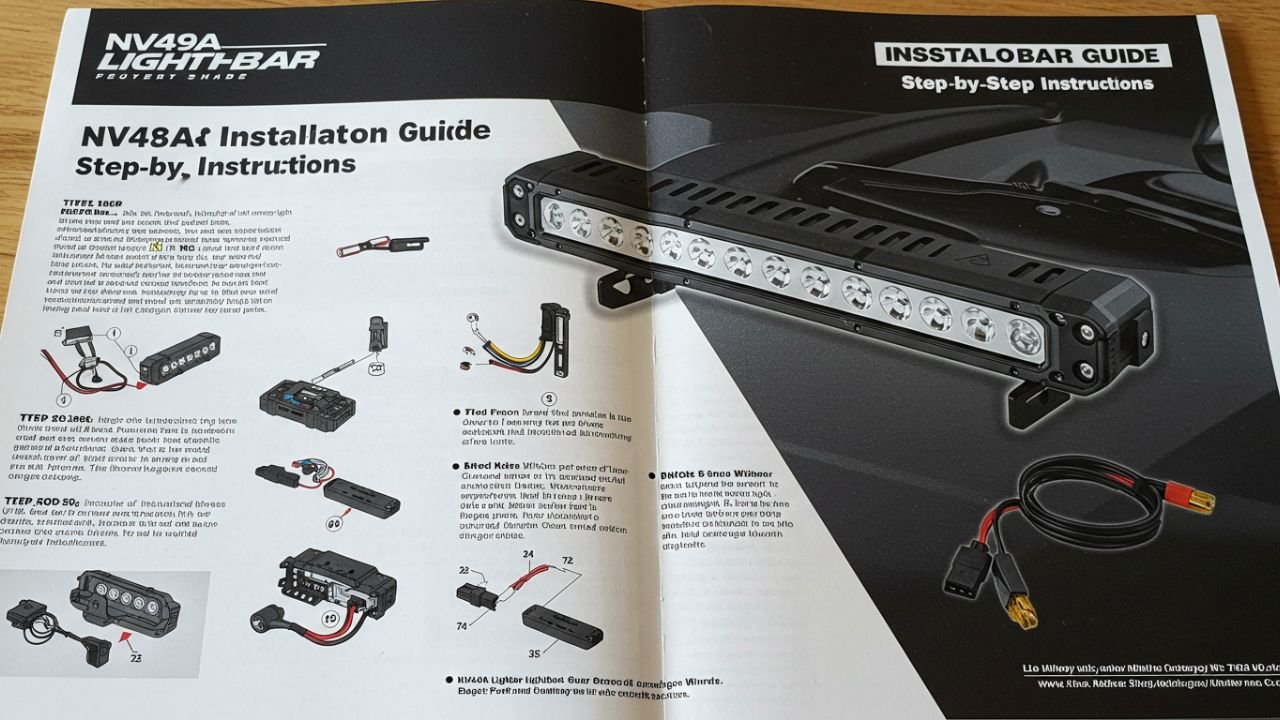
Step-by-Step Guide to Installing the NV49A Lightbar
To begin with, gather your tools and materials. Having everything ready will streamline the process. First, position the NV49A lightbar on your vehicle’s roof or designated mounting area. Ensure it is centered for optimal visibility and attach it securely using brackets. Next comes the wiring setup. Carefully route the wires along a path that avoids sharp edges and moving parts. Use zip ties to keep everything organized.
When connecting to a power source, identify your vehicle’s fuse box. The lightbar typically requires direct connection to the battery or an appropriate switch in the cabin for easy access during emergencies. Once connected, test the functionality of each mode before finalizing installation. This ensures you catch any issues early on while making adjustments simpler if necessary.
A. Mounting the Lightbar on the Vehicle
Mounting the NV49A lightbar is a crucial step that requires precision and care. Start by selecting an ideal location on your vehicle’s roof or designated mounting area. Ensure it’s free from obstructions to maximize visibility. Utilize the provided hardware for secure attachment. Most installations require brackets designed specifically for the NV49A, which help stabilize the structure during operation. Once you’ve positioned the lightbar, use a level to ensure it’s straight. This will enhance both functionality and aesthetics.
Tighten all screws firmly but be cautious not to overdo it; overtightening can lead to damage or misalignment over time. Double-check your work before moving forward with wiring setup. With careful placement secured, your lightbar is ready for its important role in enhancing safety and visibility on the road ahead.
B. Wiring Setup
Once you’ve mounted the NV49A lightbar, it’s time to tackle the wiring setup. Begin by gathering your wiring harness and ensuring all components are within reach. Start with connecting the lightbar’s wires to the corresponding colors in your harness. Typically, red is for power while black represents ground. Make sure each connection is secure to prevent any electrical issues later on.
Use heat shrink tubing or electrical tape to protect exposed connections from moisture and wear. This step is crucial for enhancing durability over time. Next, route the wiring neatly along your vehicle’s frame, avoiding sharp edges that could cause abrasion. Use zip ties to keep everything organized and tucked away safely. This careful approach not only maintains a clean look but also ensures long-lasting performance of your NV49A lightbar installation.
C. Connecting to Power Source
Connecting the NV49A Lightbar to a power source is a crucial step in ensuring it operates effectively. Begin by locating your vehicle’s battery and identifying the positive and negative terminals. Use high-quality wiring connectors for this task. It’s essential to secure each connection tightly, preventing any potential short circuits that could damage the lightbar or your vehicle’s electrical system. Consider using fuse protection in line with the positive wire. This will help safeguard both your lightbar and other electronic components from power surges.
Once connected, double-check all connections before powering on the lightbar. Ensuring everything is correctly wired will help avoid any unnecessary troubleshooting later on. Taking these careful steps creates a reliable setup that maximizes performance while minimizing risks associated with improper installation.
Troubleshooting Tips
If you encounter issues with your NV49A lightbar, start by checking the power supply. Ensure that all connections are secure and there are no loose wires. Next, inspect the fuse. A blown fuse can lead to total failure of the unit. Replace it if necessary and test again. If you’re facing dim lights or flickering, this could be a sign of faulty wiring or poor connection points. Review each wire for signs of wear or damage.
Sometimes, interference from other electronic devices can cause erratic behavior in LED lightbars. Try turning off nearby electronics to see if performance improves. Consult the user manual for specific error codes related to your model. Understanding these can significantly streamline troubleshooting efforts without unnecessary guesswork.
Maintenance and Care of NV49A Lightbar
To keep your NV49A lightbar in top condition, regular maintenance is key. Start by inspecting the unit for any signs of damage or wear. Look closely at the lenses and ensure there are no cracks or scratches that could impair visibility. Cleaning is essential too. Use a soft cloth with mild soap and water to wipe down the exterior. Avoid harsh chemicals, as they may degrade materials over time.
Check all wiring connections periodically. Loose wires can cause functionality issues or even electrical hazards. Secure any loose components firmly. Store your lightbar in a dry environment when not in use. Extreme weather conditions can affect its performance, so proper storage extends its lifespan significantly.
Conclusion
Installing the NV49A lightbar can greatly enhance your vehicle’s visibility and safety. By following this guide, you have equipped yourself with the knowledge to mount it effectively, ensure proper wiring, and connect it to a power source without any hassle. Regular maintenance will keep your lightbar in top condition for years of reliable service.
Whether you’re using it for professional purposes or personal use, maintaining its functionality is key. Keep an eye on connections, clean the lenses regularly, and check for any signs of wear or damage. With these steps behind you, enjoy driving with enhanced illumination and peace of mind that comes with a properly installed NV49A lightbar. Happy travels!